

 |
 |
 |
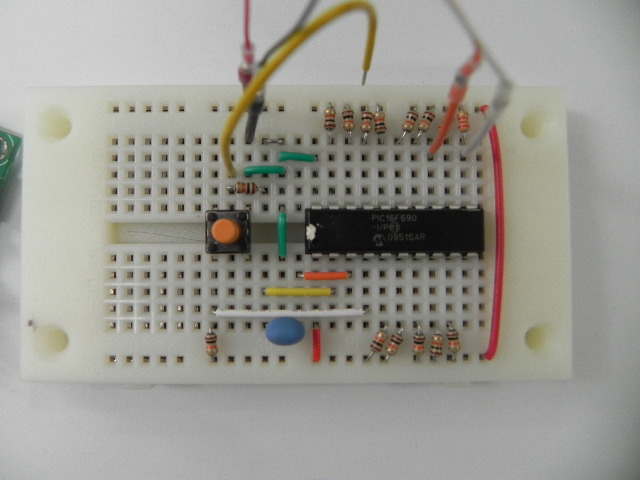
scl(11)とsda(13)は2.2kΩでプルアップしています。それ以外はチェックのため10kΩを繋げています。実際に使うときにこの値を用いるという意味ではありません。 タクトスイッチの上部から伸びている黄色の線はA/Dコンバーターのチェック用です。繋ぐとVdd/2が供給されます。繋がないと当たり前ですがプルアップしているからVddの電圧になります。 |
| I2Ccheck.cpp | |
|---|---|
#include "common.h"
#include "primary.h"
#include "interruptClass.h"

#include "PICi2c.h"

BYTE getSW();        //スイッチ読み込み
void startInit(char* str);

extern "C"
{
  unsigned char getch();
  char getchar();
}

PICi2c comm;
Timer tm;

union {
  unsigned char read_data[14];       // read data
  struct {
    char status, status2;
    int ad[6];
  } an;
} dt;

char command0()
{
  char ch;
  comm.PIC_SWsetup(); // setup switch
  while(comm.PIC_SW() && !(ch=getch()));  // スイッチが押されるのを待つ
  LED(2);
  tm.wait(100);
  LED(0);
  if(ch==0xff) ch='0';
  return ch;
}

char command1()
{
  char ch;
  comm.PIC_getData(0x10, 0);   // A/D converter
  while(!(ch=getch()))
  {
    comm.PIC_getData(0x11, 0, dt.read_data, 14);   // A/D converter
    for(int i=0; i<6; i++) printf("%4d ", dt.an.ad[i]);
    printf("\n");
  }
  LED(2);
  tm.wait(100);
  LED(0);
  return ch;
}

char command2()
{
  printf("\nDigital inputテスト ***\n");
  int x;
  char ch;

  comm.PIC_getData(0x20, 0xff);   // 全ビット入力
  while(!(ch=getch()))
  {
     LED(2);
     x = comm.PIC_getData(0x22, 0x00);
     tm.wait(50);   //
     LED(0);
     printf("%2x\n", x);
     tm.wait(50);   //
  }
  return ch;
}

void main()
{
  char cmd='0';
  startInit("\nPIC i2cテスト ***\n");
  printf("push switch and enter next command\n");
  while(true)
  {
    switch(cmd)
    {
      case '0': cmd = command0(); break;
      case '1': cmd = command1(); break;
      case '2': cmd = command2(); break;
      default:  cmd = getchar();  break;
    }
    printf("command %c\n", cmd);
  }
}

void startInit(char* str)
{
  init();
  LED(1);  // 緑
  while(!getSW() );
  LED(0);
  printf(str);
}
|
1 2 3 4 5 6 プロトタイプ宣言 7 8 9 10 C言語関数のプロトタイプ宣言 11 12 キーボード入力チェック 13 一文字入力 14 15 16 PICと通信するオブジェクト 17 タイマーオブジェクト 18 19 A/Dコンバータのデータコピー領域 20 21 22 23 バイトデータをintにする 24 25 26 27 PICのタクトスイッチが押されたかどうかをチェックする 28 29 30 31 Teratermからキーが押されても抜ける 32 33 34 35 タクトスイッチが押された場合コマンド0を続ける 36 それ以外はそのコマンドに移行する 37 38 39 6チャンネルのA/Dコンバータの値を読む 40 PA0-2、PC0-2の6ポートを用いる 41 42 A/Dコンバータのセットアップ 43 キーボードが押されるまで実行を続ける 44 45 データを読み込む 46 データの表示 47 48 49 50 51 52 次のコマンドへ 53 54 55 デジタル入出力コマンド 56 ここでは入力のみをテストする 57 58 59 60 61 ポートC8bit全部をデジタル入力に設定 62 63 64 65 データ入力 66 67 68 69 70 71 次のコマンドへ 72 73 74 75 76 77 78 始めは強制的にコマンド0が実行される。 79 従ってPIC側のタクトスイッチを押すか 80 キーボードで次のコマンドを入力する必要がある。 81 82 83 84 85 86 87 88 89 90 91 92 93 94 95 96 97 98 99 |
| 上級 |
|---|
データフォーマット:22byteの配列が必要です。
Data     0      1    2    3    4    5    6    7    8    9   10   11   12   13
    status status AN0H AN0L AN1H AN1L AN2H AN2L AN4H AN4L AN5H AN5L AN6H AN6L
                       X         Y         Z      距離L     距離R      温度
     14      15      16     17     18    19     20     21
   RedH  RedL  GreenH  GreenL  BlueH  BlueL   IntH   IntL
|
| PICi2c.h | |
|---|---|
#ifndef _PICI2C
#define _PICI2C

#include "i2c.h"
#include "Timer.h"

class PICi2c : i2c
{
protected:
  unsigned char rdata[3];
  Timer tm;

public:
  unsigned char PIC_WRITE;
  unsigned char PIC_READ;
  PICi2c(unsigned w){
    w &= 0xfe;
    PIC_WRITE= w;
    PIC_READ = w+1;
  }
  PICi2c(){
    PIC_WRITE= 0xA0;
    PIC_READ = 0xA1;
  }

  void PIC_sendByte(unsigned  reg, unsigned  dt);
  unsigned char PIC_readByte(unsigned  reg);
  int PIC_getData(unsigned func, unsigned param, unsigned char Data[], unsigned n);
  int PIC_getData(unsigned func, unsigned param);
  int PIC_putchar(unsigned char);
  int PIC_putString(unsigned char* ch);
  int PIC_CheckStatus();
  void PIC_SWsetup();
  int PIC_SW();
  void PIC_EEPROMwrite(unsigned char address, unsigned char data);
  unsigned char PIC_EEPROMread(unsigned char address);
};
#endif
|
1 2 3 4 5 6 7 8 9 10 内部バッファ 11 12 13 14 PICのWriteアドレス 15 PICのReadアドレス 16 アドレス設定 17 18 19 20 21 22 デフォールトのアドレス 23 24 25 26 27 28 29 30 31 32 33 34 35 36 37 38 |
| PICi2c.cpp | |
|---|---|
#include "PICi2c.h"
#include "iodefine.h"
#include "cpu.h"
extern cpu CPU;

/* ----------------------------------------------------------------------
    PIC_sendByte
    PIC のレジスタに1バイト送信する
---------------------------------------------------------------------- */
void PICi2c::PIC_sendByte(unsigned  reg, unsigned  dt) {

    unsigned char rdt;

    i2c_waitBusFree();                      // i2c バス空き待ち
    do {
        i2c_setTransmitMode(3);             // マスタ送信モード
        i2c_sendStartCondition();           // i2c バスを開始条件にする
        rdt = i2c_sendByte(PIC_WRITE);      // スレーブアドレスを送信
    } while(rdt == 1);                      // デバイスからACKが返るまでガンバル
    i2c_sendByte(reg);                      // レジスタ番号を送信
    i2c_sendByte(dt);                       // データを送信
    IIC2.ICSR.BIT.TEND = 0;
    i2c_sendStopCondition();                // i2c バスを停止条件にする。
    i2c_setTransmitMode(0);                 // スレーブ受信モードにする
}

/* ----------------------------------------------------------------------
    PIC_readByte
    PIC のレジスタから1バイト受信する
---------------------------------------------------------------------- */
unsigned char PICi2c::PIC_readByte(unsigned  reg) {

    unsigned char rdt;

    i2c_waitBusFree();                      // i2c バス空き待ち
    do {
        i2c_setTransmitMode(3);             // マスタ送信モード
        i2c_sendStartCondition();           // i2c バスを開始条件にする
        rdt = i2c_sendByte(PIC_WRITE);  // スレーブアドレスを送信
    } while(rdt == 1);                      // デバイスからACKが返るまでガンバル
    i2c_sendByte(reg);                      // レジスタ番号を送信
    i2c_setTransmitMode(3);                 // マスタ送信モード
    i2c_sendStartCondition();               // i2c バスを開始条件にする
    i2c_sendByte(PIC_READ);             // スレーブアドレスを送信
    i2c_setTransmitMode(2);                 // マスタ受信モード
    IIC2.ICSR.BIT.TDRE = 0;
    rdt = i2c_receiveByte(1, 1);            // ACK=1, RCVD = 1で受信する。
    i2c_sendStopCondition();                // i2c バスを停止条件にする。
    IIC2.ICCR1.BIT.RCVD = 0;
    i2c_setTransmitMode(0);                 // スレーブ受信モードにする

    return(rdt);
}

/* ----------------------------------------------------------------------
    PIC_getData
    PIC からデータをnバイト受信する
---------------------------------------------------------------------- */
int PICi2c::PIC_getData(unsigned func, unsigned param, unsigned char Data[], unsigned n)
{
  int i, n1;
  unsigned char rdt;
  n1 = n-1;
  i2c_waitBusFree();                    // i2c バス空き待ち
  i=0;
  do {
    i2c_setTransmitMode(3);             // マスタ送信モード
    i2c_sendStartCondition();           // i2c バスを開始条件にする
    rdt = i2c_sendByte(PIC_WRITE);      // スレーブアドレスを送信
    if(i++ == 1000) {                   // 返事が無かったらあきらめる
      //break;
      i2c_sendStopCondition();          // i2c バスを停止条件にする。
      i2c_setTransmitMode(0);           // スレーブ受信モードにする
      return 2;
    }
  } while(rdt == 1);                    // デバイスからACKが返るまでガンバル
  i2c_sendByte(func);                   // レジスタ番号を送信
  i2c_sendByte(param);
  i2c_sendStartCondition();             // i2c バスを開始条件にする
  i2c_sendByte(PIC_READ);               // スレーブアドレスを送信
  i2c_setTransmitMode(2);               // マスタ受信モード
  for(i=0; i< n; i++) {
    IIC2.ICSR.BIT.TDRE = 0;
    if(i==n1) Data[i] = i2c_receiveByte(1, 1); // ACK=1, RCVD = 1で受信する。
    else Data[i]  = i2c_receiveByte(0, 0);
    IIC2.ICCR1.BIT.RCVD = 0;
  }
  i2c_sendStopCondition();                // i2c バスを停止条件にする。
  i2c_setTransmitMode(0);                 // スレーブ受信モードにする
  return 0;
}

int PICi2c::PIC_getData(unsigned func, unsigned param)
{
  PIC_getData(func, param, rdata, 1);
  return rdata[0];
}

int PICi2c::PIC_putchar(unsigned char ch){
  int x= PIC_getData(0x30, ch, rdata, 1);
  do {
	PIC_getData(0, 0, rdata, 1);
  } while(rdata[0]);
  for(int j=0; j<200; j++) CPU.delay(60000);
  return x;
}

int PICi2c::PIC_putString(unsigned char* ch){
  int i, x;
  for(i=0; ch[i]!=0; i++)
    PIC_getData(0x40+i, ch[i], rdata, 1);
  x = PIC_getData(0x31, 0, rdata, 1);
  return x;
}
int PICi2c::PIC_CheckStatus(){
  PIC_getData(0, 0, rdata, 1);
  return rdata[0];
}

void PICi2c::PIC_SWsetup(){
  PIC_getData(0x01, 0, rdata, 1);
}
int PICi2c::PIC_SW(){
  PIC_getData(0x02, 0, rdata, 1);
  return rdata[0];
}

void PICi2c::PIC_EEPROMwrite(unsigned char adr, unsigned char data)
{
  PIC_getData(0x60, adr, rdata, 3);
  tm.waitUS(1500);
  PIC_getData(0x61, data, rdata, 3);
  do{
    PIC_getData(0, data, rdata, 3);
  } while(rdata[0]);
}
unsigned char PICi2c::PIC_EEPROMread(unsigned char adr)
{
  PIC_getData(0x60, adr, rdata, 3);
  tm.waitUS(1500);
  PIC_getData(0x62, adr, rdata, 3);
  do{
    PIC_getData(0, adr, rdata, 3);
  } while(rdata[0]);
  return rdata[1];
}
|
1 2 3 4 5 6 7 8 9 10 11 12 13 14 15 16 17 18 19 20 21 22 23 24 25 26 27 28 29 30 31 32 33 34 35 36 37 38 39 40 41 42 43 44 45 46 47 48 49 50 51 52 53 54 55 56 57 58 59 60 61 62 63 64 65 66 67 68 69 70 71 72 73 74 75 76 77 78 79 80 81 82 83 84 85 86 87 88 89 90 91 92 93 94 95 96 97 98 99 100 101 102 103 104 105 106 107 108 109 110 111 112 113 114 115 116 117 118 119 120 121 122 123 124 125 126 127 128 129 130 131 132 133 134 135 136 137 138 139 140 141 142 143 144 145 146 |
| main.c |
|---|
// I2Cをハードを用い、割り込み処理を行う // ハードでのslave動作。 // H8-36064からアクセスからリクエストされ、データを送り返す // AD : RA0-RA2, RC0-2 // Digital: RC0-7 // SW : RA3 // I2C: RB4, RB6 // LCD: RB7 調整中 |