IR Range Sensor class |
---|
/** * IR Range Sensor Class * * IR range sensors support */ public class IrRangeSensor : BaseSensor { protected IrRangeSensorTask sensorTask ; protected int direction ; protected int distance ; protected bool _obstacleDetected = false ; protected int deadband ; readonly int noObstacle = 500 ; /** * IR range sensorオブジェクトを作り、タスクをサポートする * * 入力:Cpu.Pin leftDetectorPin: 左センサーの入力ピン * 入力:Cpu.Pin rightDetectorPin: 右センサーの入力ピン */ public IrRangeSensor(Cpu.Pin leftDetectorPin, Cpu.Pin rightDetectorPin) { sensorTask = new IrRangeSensorTask ( this , leftDetectorPin , rightDetectorPin ) ; } /** * obstacleDetectedが呼び出し可能かどうか調べる * * 戻り:obstacleDetectedが呼び出し可能の場合trueを返す */ public new bool ready () { sensorTask.checkSensors() ; return _ready ; } /** * 障害物が検出されたかどうか調べる * 通常、イベントを用いるのに対してポーリング時に用いる * * 戻り:障害物の検出値 */ public override bool obstacleDetected() { sensorTask.checkSensors() ; _ready = false ; return _obstacleDetected ; } /** * 障害物の初期位置を調べる * シンプルな検出システムでは左右の物体の検出は前方になります * * 戻り:障害物の相対方向 (left, right, etc.) */ public override int obstacleDirection() { return direction ; } /** * 指定された方向における障害物までの距離を得る * none値は物体は検出されなかったことを意味する * * 入力:int direction:距離を求める方向 * * 戻り:指定された方向における障害物までの距離 */ public override int obstacleDistance(int direction) { return distance ; } /** * センサー情報に基づいた結果を更新する * Called by sensor task when results available. * * 入力:int: resultLeft: * 入力:int: resultRight: */ public void saveResults ( int resultLeft, int resultRight ) { // 現在の結果が有効 // 障害物のステータスを保存する switch ( (( resultLeft < noObstacle ) ? 1 : 0 ) + (( resultRight < noObstacle ) ? 2 : 0 )) { default: case 0: _obstacleDetected = false ; break; case 1: direction = left ; distance = resultLeft ; _obstacleDetected = true ; break; case 2: direction = right ; distance = resultRight ; _obstacleDetected = true ; break; case 3: // 両方のセンサーが障害物を認識 if ( System.Math.Abs ( resultLeft - resultRight ) < deadband ) { // 両方の距離は非常に近い direction = front ; distance = ( resultLeft > resultRight ) ? resultLeft : resultRight ; } else if ( resultLeft > resultRight ) { // 左のセンサーは高い値 direction = left ; distance = resultLeft ; } else { // 右のセンサーは高い値 direction = right ; distance = resultRight ; } _obstacleDetected = true ; break; } _ready = true ; notify(); } } |
単純な障害物回避タスク |
---|
/** * 単純な障害物回避タスク * * センサーオブジェクトを用いて障害物から離れているように試みる * Boe-Botは固定の増加量で移動する */ public class AvoidObstacleTask : Task { BoeBotInterface jbot; BaseSensor sensor; public AvoidObstacleTask(BaseSensor sensor, BoeBotInterface jbot) { this.sensor = sensor; this.jbot = jbot; } protected override void execute() { const int turnAround = 1; switch (state) { case initialState: if (sensor.obstacleDetected()) { int direction = sensor.obstacleDirection(); if (sensor.obstacleDistance(direction) <= 5) { // 接近しすぎ、5センチバックして回転する Console.WriteLine("接近しすぎ、5センチバックして回転する"); jbot.move(-5); jbot.wait(turnAround); } else { // オブジェクトから離れて旋回する十分な領域 Console.WriteLine("オブジェクトから離れて旋回する十分な領域"); if (direction < 75) { // 左に何かがある Console.WriteLine("左に何かがある"); jbot.pivot(-2); } else { // 前か左に何かある Console.WriteLine("前か左に何かある"); jbot.pivot(2); } //jbot.wait(turnAround); jbot.wait(initialState); } } else { // 何もない。2センチ前に移動する。 Console.WriteLine("何もない。2センチ前に移動する。"); jbot.move(2); jbot.wait(initialState); } break; case turnAround: // Boe-Botを後退させる。180度旋回させる時間 Console.WriteLine("Boe-Botを後退させる。180度旋回させる時間"); jbot.pivot(0); jbot.wait(initialState); break; default: // デフォールトは異常な状態を捕獲する stop(); break; } } } |
AvoidObstacleTaskクラスをテストする |
---|
namespace AvoidObstacleTaskIrRangeTest1 { public partial class Program { public void main() { new AvoidObstacleTask ( new IrRangeSensor(CPU.P1 // leftDetectorPin , CPU.P0 // rightDetectorPin , 5 // deadband ) , new RampingBoeBot(new MultitaskingBoeBot())); Task.TaskManager(); Console.WriteLine("All done"); } } } |
EEPROM Electrically Erasable Programmable Read-Only Memory |
---|
電気的に消去(書き換え)できるROMのこと。電源を切ってもデータは消えません。データの消去には5Vより高い電圧が必要ですが、最近のEEPROMは内部で電源電圧の5Vを昇圧しているため、基板に実装したままデータを消去して書き換えるのが容易になりました。そのためシステムの動作中にデータを書き換えることができます。ただEEPROMには、およそ数十万~百万回までしか、消去/書き換えができないという欠点があります。さらにEEPROMはそのデータを1bitだけ書き換えるときにも、すべてのbitをいったん消去して書き換えなければならないため、RAMのようにランダムな読み書きは困難です。この欠点を改良したのがフラッシュメモリです。 |
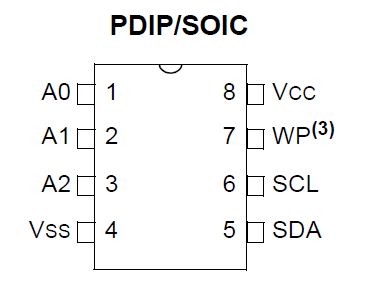
24LC64というI2CシリアルEEPROMの読み書きテストをしてみます。 これは64kビット、つまり8kバイトのEEPROMです。 ここでは、A0=A1=A2=0としたアドレスを用います。 従って、アドレス部のビットパターンは0b1010000rとなります (rは1の時read、0の時writeとなります) 16進数で表すと0xA0となります(writeの時)。 一般的なアドレス表示ではこれを1ビット右シフトした値0x50となります。 WPはwrite protectなので、書き込む場合にはlowにしておく必要があります。 SCLとSDAは適当な(出鱈目という意味ではない)抵抗でプルアップしておくのを忘れないようにします。 |
I2Cを用いたEEPROMのテスト |
---|
using System; using System.Threading; using Microsoft.SPOT; using Microsoft.SPOT.Hardware; using SecretLabs.NETMF.Hardware; using SecretLabs.NETMF.Hardware.NetduinoMini; using BOEBotLib; // sda --- P4 // scl --- P5 // eeprom sda 5 // scl 6 namespace EEPROMtest { public class Program { public static void Main() { Console.setBaud(); //new Console(); // clockrate, timeout //OutputPort p=new OutputPort(CPU.P4,true); EEPROM rom = new EEPROM(100,100); //while(true) rom.write((UInt16)0, (byte)12); rom.write((UInt16)1, (byte)34); byte data1 = rom.read((UInt16)0); byte data2 = rom.read((UInt16)1); Console.WriteLine("data1=" + data1); Console.WriteLine("data2=" + data2); byte[] data3 = new byte[16]; for (int i = 0; i < 16; i++) data3[i] = (byte)( i+100); rom.write16((UInt16)0, data3); byte[] data = rom.read16((UInt16)0); foreach (byte x in data) { Console.WriteLine((int)x + " "); } } } } |
data1=12 data2=34 100 101 102 103 104 105 106 107 108 109 110 111 112 113 114 115課題5-4